🔍 Skip the Setup. Get the Pipeline.
OpenClaw takes hours to configure and still requires you to build the strategy. ScalixAI manages your Google Ads end-to-end — structure, attribution, optimisation, reporting.
Share this Article


Key takeaways
OpenClaw setup requires a Google developer token that takes up to 5 business days.
OAuth 2.0 credential configuration is where most non-developers hit the first wall.
OpenClaw is an interface, whereas campaign strategy and attribution setup are entirely separate problems.
A running MCP server must stay active manually; it doesn't persist across machine restarts.
Pipeline accountability belongs to you with OpenClaw; ScalixAI owns that outcome instead.
OpenClaw setup is one of the more technically involved ways to connect AI to your Google Ads account. If you're a B2B SaaS founder or growth marketer evaluating whether it's worth the effort, this guide gives you the honest picture.
We'll walk through every step, surface the real complexity, and help you decide whether a DIY configuration or a fully managed alternative makes more sense for where your company is right now.
TL;DR
OpenClaw is an open-source MCP server that connects Claude to your Google Ads account via the Google Ads API. Setup requires a Google Cloud project, OAuth 2.0 credentials, a developer token, Node.js, and local server configuration. It works, but takes significant technical investment before it produces any campaign value. If you need pipeline results rather than a technical project, ScalixAI is the fully managed alternative built by an ex-Googler with no setup required on your end.
What Is OpenClaw and Why Are Marketers Setting It Up?
Before diving into the setup, it's worth understanding what OpenClaw actually does and why it exists.
OpenClaw is an open-source Model Context Protocol server that bridges the gap between AI assistants, primarily Claude, and the Google Ads API. Once configured, it lets you query your ad account, pull performance reports, and execute optimizations through natural language commands instead of navigating the Google Ads interface manually.
The appeal is real. Being able to ask Claude to audit your search term report, flag wasted spend, or summarize week-over-week performance is genuinely useful if you can get it running. As we covered in our OpenClaw for Google Ads overview, the tool is powerful but falls squarely into the technically demanding category.
The question worth asking before you start: Is this a project you have the technical bandwidth to own and maintain?
What You Need Before You Start
OpenClaw setup has real prerequisites. Missing any one of these stops the installation before it produces value.
[table]
Requirement | Details | Time to Obtain
Google Ads Manager Account | MCC account with admin access | Immediate if you have one
Google Ads API Developer Token | Applied for through Google, standard access requires evaluation | 2–5 business days
Google Cloud Project | With Google Ads API enabled | 30–60 minutes
OAuth 2.0 Credentials | Client ID, client secret, refresh token | 1–2 hours
Node.js (v18+) | Local installation required | 15 minutes
Claude Desktop or MCP-compatible client | Configured to recognise MCP servers | 30 minutes
Customer ID | Your Google Ads account ID (no dashes) | Immediate
[/table]
The developer token alone takes several business days. If you're trying to get OpenClaw running this week to diagnose a high CAC problem in your account, the timeline doesn't support it.
OpenClaw Setup: Step-by-Step
Step 1 — Apply for a Google Ads API Developer Token
Navigate to your Google Ads Manager Account. Go to Tools → API Centre and apply for a developer token. You'll need to describe your intended use case and estimated API call volume.
Google reviews applications manually. Standard access approval takes 2–5 business days. Basic access, which limits you to test accounts only, is granted faster but restricts what you can actually do with the tool in production.
This step alone disqualifies OpenClaw for anyone who needs to act on their B2B Google Ads strategy immediately.
Step 2 — Create a Google Cloud Project and Enable the API
Go to console.cloud.google.com and create a new project. Inside the project:
- Navigate to APIs & Services → Library
- Search for "Google Ads API" and enable it
- Confirm billing is active on the project; the API requires it even for free tier usage
This step is straightforward for developers. For founders without a Google Cloud background, the console interface is dense, and the configuration options are not intuitive.
Step 3 — Generate OAuth 2.0 Credentials
Inside your Google Cloud project:
- Go to APIs & Services → Credentials
- Click Create Credentials → OAuth 2.0 Client ID
- Set application type to Desktop App
- Download the credentials JSON file, as you'll need the client ID and client secret
You then need to generate a refresh token. This requires running a separate OAuth flow, either through Google's OAuth Playground or a local script, to exchange an authorization code for a long-lived refresh token. The refresh token is what OpenClaw uses to authenticate API calls without requiring you to log in manually each session.
This is where most non-developers hit their first real wall.
Step 4 — Install Node.js and Clone the OpenClaw Repository
OpenClaw runs on Node.js. If you don't have it installed:
- Download Node.js v18 or higher from nodejs.org
- Verify installation by running node --version in your terminal
Then clone the OpenClaw repository:

The npm install command pulls all dependencies. This takes a few minutes and requires a stable internet connection.
Step 5 — Configure Your Environment Variables
OpenClaw reads your credentials from environment variables. Create a .env file in the root directory and populate it with:
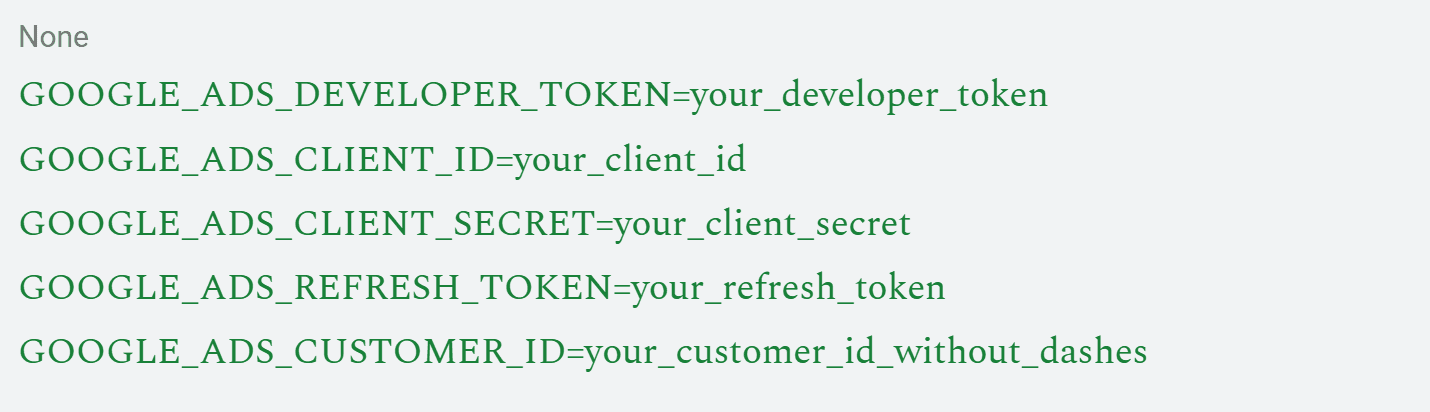
Every value must be exact. A single incorrect character in any credential produces an authentication error that can take significant time to diagnose, especially if you're not certain which credential is wrong.
Step 6 — Start the MCP Server
With credentials configured, start the server:

If everything is correct, the server starts and listens for MCP connections. If credentials are wrong, the server either fails to start or starts but returns authentication errors on the first query.
Keep this terminal window open. The server must remain running for the Claude integration to function. If you close the terminal or restart your machine, you'll need to restart the server manually.
Step 7 — Connect Claude to OpenClaw
Open Claude Desktop's configuration file, typically located at ~/Library/Application Support/Claude/claude_desktop_config.json on Mac, and add the OpenClaw server configuration:

Replace /path/to/openclaw/ with the actual path where you cloned the repository. Restart Claude Desktop after saving.
Step 8 — Test the Connection
With the server running and Claude configured, test the connection with a simple query:
"List the campaigns in my Google Ads account."
If the integration is working, Claude returns your campaign list. If it returns an error, the most common causes are:
- Incorrect path in the Claude configuration file
- Server not running in the terminal
- OAuth credentials expired or are incorrectly formatted
- Customer ID format error (must be without dashes)
Debugging connection errors without developer experience is time-consuming. Each error message requires cross-referencing the Google Ads API documentation to interpret correctly.
The Real Cost of OpenClaw Setup
Here's the honest summary of what the OpenClaw setup actually demands:
[table]
Factor | Reality
Time to first working connection | 4–12 hours for non-developers
Developer token wait time | 2–5 business days
Ongoing maintenance | The server must be restarted manually after the machine restarts
Debugging complexity | High. Errors require API documentation familiarity
Campaign strategy | Not included, OpenClaw is an interface, not a strategist
Attribution setup | Separate configuration required
Pipeline accountability | None — you own all outcomes
[/table]
The in-house vs agency decision for the B2B SaaS framework applies directly here. OpenClaw is a tool that amplifies the capability of someone who already understands Google Ads deeply. It is not a replacement for that knowledge, and it produces no pipeline on its own.
For founders allocating a seed-stage marketing budget, the question is whether technical configuration time is the highest-leverage use of the next 12 hours, or whether that time is better spent on revenue-generating work while a specialist manages the ad account.
OpenClaw vs ScalixAI: The Honest Comparison
[table]
| OpenClaw | ScalixAI
Setup time | 4–12 hours+ | None
Technical requirement | Developer-level | None
Developer token wait | 2–5 days | None
Campaign strategy | You build it | Built by an ex-Googler
Attribution | Manual | CRM-integrated
Pipeline accountability | You own it | ScalixAI accountable
Pricing | Free | $4,000–$7,000/month flat fee
Time to pipeline | Weeks (setup dependent) | First campaign cycle
[/table]
The Google Ads agency pricing comparison becomes straightforward when you factor in setup time, ongoing maintenance, and the strategy layer that OpenClaw doesn't provide.
OpenClaw is a legitimate tool for developers who want API-level control. For B2B SaaS founders who need a pipeline, the setup investment rarely justifies the outcome compared to a fully managed alternative.
The results that ScalixAI produces speak to this directly. For Delve, an AI-native compliance SaaS platform, a fully managed Google Ads engagement produced $1.2M in closed-won revenue in six months, while the founding team focused on product and sales rather than API configuration.
The ex-Googler advantage behind that result isn't something OpenClaw can replicate. Nine years inside Google means campaign decisions are grounded in how the platform actually works, not in how it's documented from the outside.
The Bottom line
OpenClaw setup is achievable, but it is not simple.
Between the developer token application, OAuth configuration, local server management, and Claude integration, a non-developer will spend the better part of a day before running their first query. And at that point, they still need the campaign strategy, the conversion tracking setup, and the attribution framework that OpenClaw doesn't provide.
For B2B SaaS founders and growth marketers who need Google Ads to produce a pipeline rather than a technical project to maintain, ScalixAI is the direct alternative.
Built by an ex-Googler, accountable to revenue, flat fee pricing, and no setup required on your end.
Explore our Google Ads management services and book a free audit to find out what your account actually needs.